

Using SmarterMail Team Workspaces
One of the many important and useful tools included with our Enterprise class Email Software by SmarterTools is collaboration via video chat with their Team Workspaces. This feature is easily


In this write up I am going to go over some of the basics with managing your email accounts with our email software SmarterMail by SmarterTools. Additional information can be found on the SmarterTools website here: https://portal.smartertools.com/kb/c2/smartermail.aspx
A best practice first step when setting up any email account is to set the Recovery Email Address. The Recovery Email Address is used in the event that you cannot access your account and need to reset the account email. The Recovery Email Address can be any other email account that you have access too. To set the Recovery Email Address, first log into your account. Then go to your Account Settings section (1) and input the Recovery Email Address into the “Recovery Email Address” input box (2) under the User block. Click the Save button (3) located at the top to complete the action. See reference image below; click to enlarge.

Now that the Recovery Email Address has been set the user can successfully recover their account and reset their password via the login screen “Forgot Password” link.

While you are in your account settings please notice the left side navigation column links (4). The links in the left side navigation column are specific to the section you are in and will change. The available left side navigation links in this area include items like: scheduling or setting up your Autoresponder, Calendar integration, email signatures and more.
Domain Administrator access is granted to those who are recognized as the company or business owner. This access level will grant you additional control and settings that a normal user will have or see. This section is accessed by clicking the Domain Settings link (5) at the top of the page. See reference image below. This section will start you in the Accounts section (6). There is a Users and Aliases tab/button (7) that spans above the grid. Clicking these will allow you to view, access, create or delete accounts and aliases in your email system.
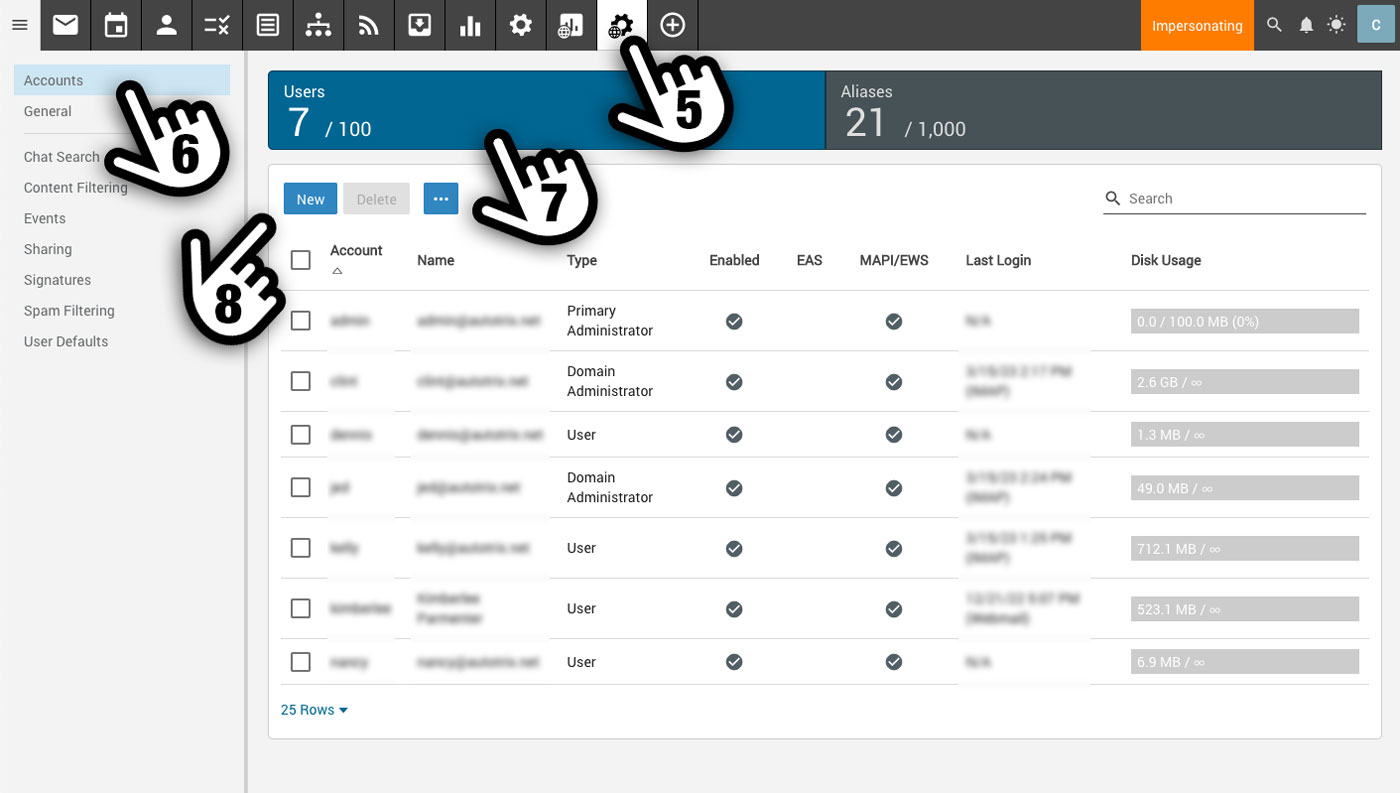
To create a new User account click the New button (8). To edit an existing User account simply click the account row you would like to modify or review. Click the Save button in the top after making any changes to complete the process. To return, or go back, you can click the Accounts link in the left navigation column (6).

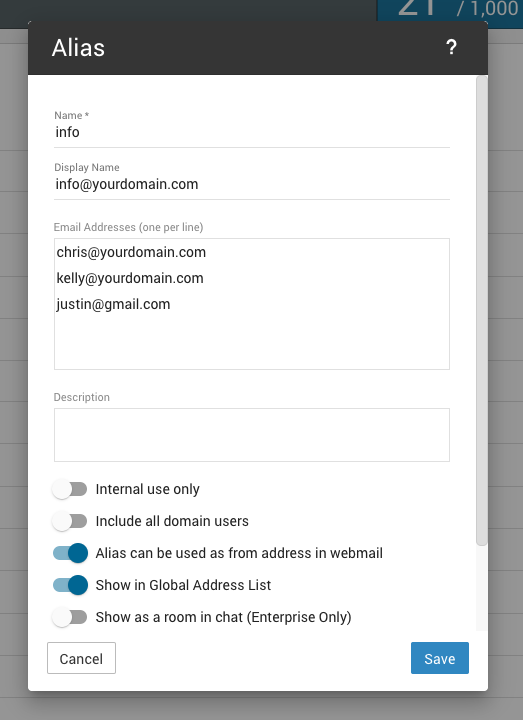
Click the Alias tab to edit or create a new Alias (9). See example image above. To edit an existing Alias simply click the item from the row you would like to modify or review. Click the New button (10) located at the top to create a new Alias. When creating an Account Name or an Alias Name remember that it only needs the prefix of the email address. For instance if you are creating an info@yourdomain.com alias; you will only need to put “info” into the name input box. The Display Name is not required and is only for internal purposes. When adding email addresses to an Alias you will need to include the entire email address. These are the email addresses that will receive messages that are sent to the info@yourdomain address. Click the save button at the bottom of the window to complete the process. See example reference image below.
One of the many important and useful tools included with our Enterprise class Email Software by SmarterTools is collaboration via video chat with their Team Workspaces. This feature is easily

All of our Business Hosting Packages include email hosting, which also means that you have access to our provided email software SmarterMail. This provided email software has many features but

Choosing and setting up payment processing or a payment processor for your e-commerce online business is a very important step. Often times business owners will opt for the easy and